American Revolutionary War
Battles for 1781
The Battle of Cowpens
January 17 , 1781 at Cowpens, South Carolina
The Battle of Cowpens was part of the Southern Theater 1775-82. The Colonial forces conducted a double envelopment of Lieutenant Colonel Banastre Tarleton’s force. The result of the battle was an American victory.
American Forces – commanded by Brig. Gen. Daniel Morgan and consisted of about 1,900 Soldiers. The American Army lost 12 men killed and about 60 men wounded. The Americans captured the British guns and baggage and the colours of the 7th Foot.
British Forces – commanded by Lt. Col. Banastre Tarleton and consisted of about 1,150 Soldiers and Indians. The British Army lost 39 officers and 60 soldiers killed, 229 wounded. 829 men were captured or missing. Tarleton was one of around 160 British troops to escape.
Battle Summary

A small force of the Continental Army under the command of Brigadier General Daniel Morgan had marched to the west of the Catawba River, in order to forage for supplies and raise the morale of local Colonial sympathizers. The British had received incorrect reports that Morgan’s army was planning to attack the important strategic fort of Ninety Six, held by American Loyalists to the British Crown and located in the west of the Carolinas. The British considered Morgan’s army a threat to their left flank.
Lieutenant General Charles Cornwallis dispatched cavalry/ dragoons commander Tarleton to defeat Morgan’s command. Upon learning Morgan’s army was not at Ninety Six, Tarleton, bolstered by British reinforcements, set off in hot pursuit of the American detachment.
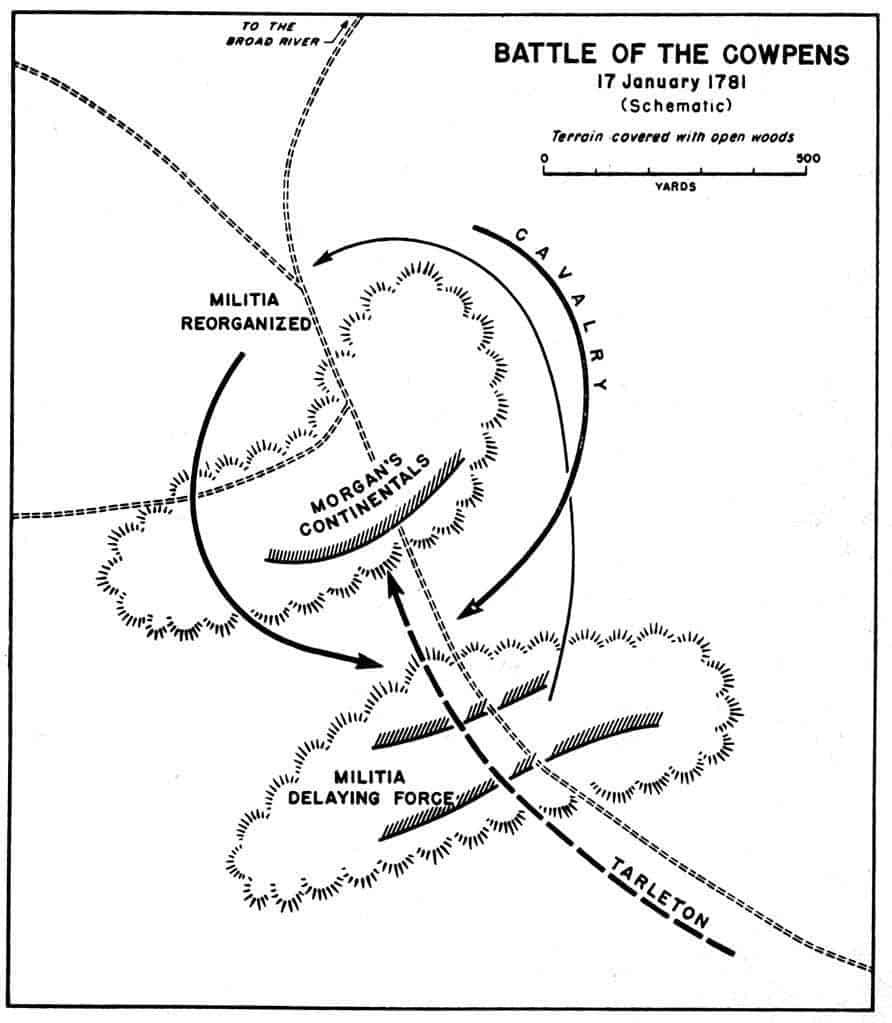
Morgan resolved to make a stand near the Broad River. He selected a position on two low hills in open woodland, with the expectation that the aggressive Tarleton would make a headlong assault without pausing to devise a more intricate plan. He deployed his army in three main lines.
Tarleton’s army, after exhaustive marching, reached the field malnourished and heavily fatigued. Tarleton attacked immediately; however, the American defence-in-depth absorbed the impact of the British attack. The British lines lost their cohesion as they hurried after the retreating Americans. When Morgan’s army went on the offensive, it wholly overwhelmed Tarleton’s force.
The battle was a turning point in the American reconquest of South Carolina from the British. Tarleton’s brigade was wiped out as an effective fighting force, and, coupled with the British defeat at King’s Mountain in the northwest corner of South Carolina, this action compelled Cornwallis to pursue the main southern American army into North Carolina.
Cornwallis was eventually defeated at Yorktown in Virginia in October 1781.
Prelude

By 1779-80, with stalemate in the North, British strategists again looked to the South. They came south for a number of reasons, primarily to assist the Loyalists, help them regain control of colonial governments, and then push north to crush the rebellion. They estimated that many of the south’s population would rally to the British cause. The British spread out across South Carolina and Georgia, setting up a chain of forts.
General George Washington knew that if Cornwallis continued moving north unchecked, the Americans would be crushed between two giant British pincer arms, with Cornwallis from the south and Lieutenant General Henry Clinton from the north. Washington ordered Major General Nathanael Greene to take command of the Southern Army along with key commanders and units.
Washington also transferred Lieutenant Colonel Henry Lee and his 350-man cavalry corps to the Carolinas. Greene decided to split his army to better harass the British over a wider region. He stayed with the American wing operating around the Camden area, and sent Brigadier General Daniel Morgan to command the second wing southwest of the Catawba River to cut the British supply lines and hamper British operations in the Ninety-Six area. Between these two American wings were Cornwallis and 4,000 British troops at Winnsboro.
Cornwallis learned in early January that Morgan was operating in the western part of the state. When he learned about Morgan’s potentially exposed position, he dispatched Tarleton to find and defeat Morgan’s force. Tarleton’s was hated, especially for his actions at the Battle of Waxhaws (Massacre). He was said to have continued the fight against remnants of the Continental Army trying to surrender. His refusal of offering no quarter, led to the derisive term “Tarleton’s Quarter“.

On January 13, Lieutenant Colonel William Washington’s cavalry was patrolling the Fair Forest area. They rode up on a large group of Tories and captured 40 of them. Washington learned that British troops were operating nearby at Musgrove’s Mill.
Morgan moved his forces away from the British until he arrived at Cowpens some 3 days later. The annihilation of a Tory regiment by Morgan’s cavalry some 50 miles north of his headquarters decided the issue for Cornwallis. He ordered Tarleton to swing west while he took the main army north to King’s Mountain. Tarleton would either drive Morgan into a trap at King’s Mountain, or engage and destroy Morgan’s force, himself.
On January 16, Tarleton was reported to have crossed the Pacolet River and was much closer than expected. Soon, Morgan intersected with and traveled west on the Green River Road. Here, with the flood-swollen Broad River 6 miles to his back, he decided to make a stand against the British at Cowpens.
On January 17, a 2:00 AM, Tarleton roused his troops and continued his march to Cowpens. Lawrence Babits states that, “in the five days before Cowpens, the British were subjected to stress that could only be alleviated by rest and proper diet“. He points out that “in the forty-eight hours before the battle, the British ran out of food and had less than four hours’ sleep”. Over the whole period, Tarleton’s brigade did a great deal of rapid marching across difficult terrain. Babits concludes that they reached the battlefield exhausted and malnourished.

Tarleton sensed victory and nothing would persuade him to delay. His Tory scouts had told him of the countryside Morgan was fighting on, and he was certain of success because Morgan’s soldiers, mostly militiamen, seemed to be caught between mostly experienced British troops and a flooding river.As soon as he reached the spot, Tarleton formed a battle line, which consisted of dragoons on his flanks, with his two grasshopper cannons in between the British Regulars and American Loyalists.
Tarleton’s plan was simple and direct. Most of his infantry (including that of the Legion) would be assembled in linear formation and move directly upon Morgan. The right and left flanks of this line would be protected by dragoon units. In reserve were the 250-man battalion of Scottish Highlanders (71st Regiment of Foot), commanded by Major Arthur MacArthur. Finally, Tarleton kept the 200-man cavalry contingent of his Legion ready to be unleashed when the Americans broke and ran.
Battle Begins
Cowpens was a well-known crossroads and frontier pasturing ground. Cowpens was located 28 miles due west of Kings Mountain. The field there was a half mile wide and one mile long. It was dotted with trees, but devoid of undergrowth. Thickety Mountain was to the southeast and the Blue Ridge Mountains was to the north. Cowpens offered advantageous terrain for the type of combat he intended to wage against Tarleton.
Morgan learned of Tarleton’s pursuit, and had spread the word for militia units to rendezvous at the Cowpens. Camp was made in a swale between two small hills, and through the night, Colonel Andrew Pickens’ militia drifted into camp. Across the border in Winnsboro, a British force of over 3,000 troops were awaiting the end of winter to resume the offensive.
Morgan had with him 1,000 soldiers (533 militiamen, 237 Continentals, 80 cavalrymen, and about 200 independent riflemen). He began to arrange his command into a clever deployment. Some 150 militia were placed in front as a skirmish line, commanded by Majors John McDowell and John Cunningham. Morgan asked that they fire two volleys and retire back to the second line 150 yards to their rear. The second line had 300 militia, commanded by Pickens. Morgan asked them to wait until the British were within easy range, aim at the officers, and then fire two volleys before retiring 150 yards uphill to the third line, where they would then reform. The third line would have 450 mostly Continental troops, commanded by Lieutenant Colonel John Howard. This formation was flanked on both sides by 200 Virginia independent riflemen. Washington’s cavalry were placed in the rear as a reserve force.

Tarleton formed his command for battle with the 7th Regiment of Foot on the left and 3 light infantry companies extending the line to the right across the road. Two detachments of dragoons, about 50 men in each, were posted to the flanks, one on each side. Tarleton formed his 280 light cavalry behind the main line, and on the left center unlimbered his pair of guns, one on either side of the Legion infantry. In his rear was the 71st Highlander Regiment.
While Greene had all of North Carolina to protect, Cornwallis had his own vulnerabilities: his army’s supply lines, and the large number of British sympathizers in South Carolina. To move against Morgan would allow Greene take his main supply base at Charleston. Converging on Greene would let Morgan travel south to pick off Fort Ninety-Six and take control of the largest concentration of loyalists in South Carolina, as well as one of its most productive farming areas.
On January 17, at dawn, Morgan looked south from the top of a gently sloping hill toward Tarleton and his British Legion. For the last 3 days, Tarleton had pursued Morgan across the rivers of western South Carolina.
Morgan’s scouts brought news of Tarleton’s approach. Tarleton, having marched since 2:00 AM, ordered formation on the Green River Road for the attack.
Morgan put his militia in front to wear down the British before they got to the main line. He urged them before the battle to fire two volleys and then withdraw behind the Continentals, where they would reform and go back into battle. The skirmishers who were to be posted farthest forward, the best shots among the militiamen, were urged to concentrate on British officers before retreating to the main line of resistance.

At 7:00 AM, Tarleton ordered his men to charge the American lines. His lead cavalry moved out of the surrounding woods and into the sights of Morgan’s skirmishers, drawing their fire. The first line of militia opened fire on the advancing British troops. They fired two volleys and withdrew to the second line as planned.
During this time, the British artillery ignored the fighting and fired instead on the third Continental line on the hill. The rounds overshot, landing among Washington’s cavalry behind the hill, and causing nothing more serious than their move to a quieter position behind the American left.
At about 100 yards, Pickens ordered the second line to open fire. The Virginia riflemen posted on the flanks cut apart the British dragoons and drove them back. The second line then withdrew back to the third line as planned. The 17th Dragoons on Tarleton’s right thought the the withdrawing Patriots were retreating.
The dragoons enthusiastically rode forward, thinking that they would easily cut apart the militia. They were soon fired upon by Washington’s cavalry and Virginia riflemen and was forced back in great confusion.
The British then marched within range of Howard’s third line, which opened fire on the British. Tarleton ordered up the Highlanders to crush Morgan’s right flank. Howard ordered his right side of the line to not advance to meet the British which resulted in some confusion. The right side steadied themselves and fired into the advancing British at close range. Howard sensed that the British was wavering and ordered his ment to follow it up with a bayonet charge.
The British infantry started to charge over the hill. Just as the British passed the crest of the hill, ready to bayonet the Americans, Howard’s ordered his troops to wheel about and they fired with every musket at a distance of less than 30 yards. Then, they leveled their bayonets and charged. At the same instant, Washington’s cavalry slammed into the surprised British from behind. It was more than enough to break both the British line. They troops threw their weapons away and took off down the Green River Road, but many asked for quarter. Within a few minutes, the British retreat on Tarleton’s left turned into a complete rout. The panic quickly spread to the British reserve.

In one last desperate effort to save the day, Tarleton ordered the cavalry command to charge the American riflemen. The 200 dragoons refused his order and rode off the field. With only about 55 cavalrymen, Tarleton launched a final charge. Washington’s cavalrymen countercharged and a short fight began.
The fight only lasted a few minutes, but became one of the most dramatic cavalry fights in the war. Abandoned by the army, the British artillerymen fought to the last man in a futile attempt to save their guns. They would soon be forced to surrender.
At 7:50 AM, and the battle was, for all practical purposes, over. With the British troops fleeing the battlefield, Tarleton had no choice but to admit defeat, and with a handful of his men, fled down the Green River Road.
With Cornwallis’s command only 20 miles away and closing in on him, Morgan paroled the British officers, left the care of the wounded men to the local citizens, and withdrew his force northward. In one of the most dramatic moments of the battle, Washington, racing ahead of his cavalry, dueled hand-to-hand with Tarleton and two of his officers. Tarleton and his remaining forces galloped away to Cornwallis’ camp.
Aftermath
Tarleton’s apparent recklessness in pushing his command so hard in pursuit of Morgan that they reached the battlefield in desperate need of rest and food may be explained by the fact that, up until Cowpens, every battle that he and his British Legion had fought in the South had been a relatively easy victory. He appears to have been so concerned with pursuing Morgan that he quite forgot that it was necessary for his men to be in a fit condition to fight a battle once they caught him, though Cornwallis himself did press Tarleton to take aggressive action.
Coming in the wake of the American debacle at Camden, Cowpens was a surprising victory and a turning point that changed the psychology of the entire war—”spiriting up the people“, not only those of the back country Carolinas, but those in all the Southern states. As it was, the Americans were encouraged to fight further, and the Loyalists and British were demoralized. Furthermore, its strategic result—the destruction of an important part of the British army in the South—was incalculable toward ending the war.
Along with the British defeat at the Battle of Kings Mountain, Cowpens was a serious blow to Cornwallis, who might have defeated much of the remaining resistance in South Carolina had Tarleton won at Cowpens. Instead, the battle set in motion a series of events leading to the end of the war. Cornwallis abandoned his pacification efforts in South Carolina, stripped his army of its excess baggage, and pursued Greene’s force into North Carolina. Skirmishes occurred at the Catawba River (February 1, 1781) and other fords.
Yet, after a long chase, Cornwallis met Greene at the Battle of Guilford Court House, winning a pyrrhic victory that so damaged his army that he withdrew to Yorktown, Virginia, to rest and refit. Washington seized this opportunity to trap and defeat Cornwallis at the Battle of Yorktown, which caused the British to give up their efforts to defeat the Americans.