The Battle of Briar Creek
March 3, 1779 at Briar Creek, Georgia

Battle Summary
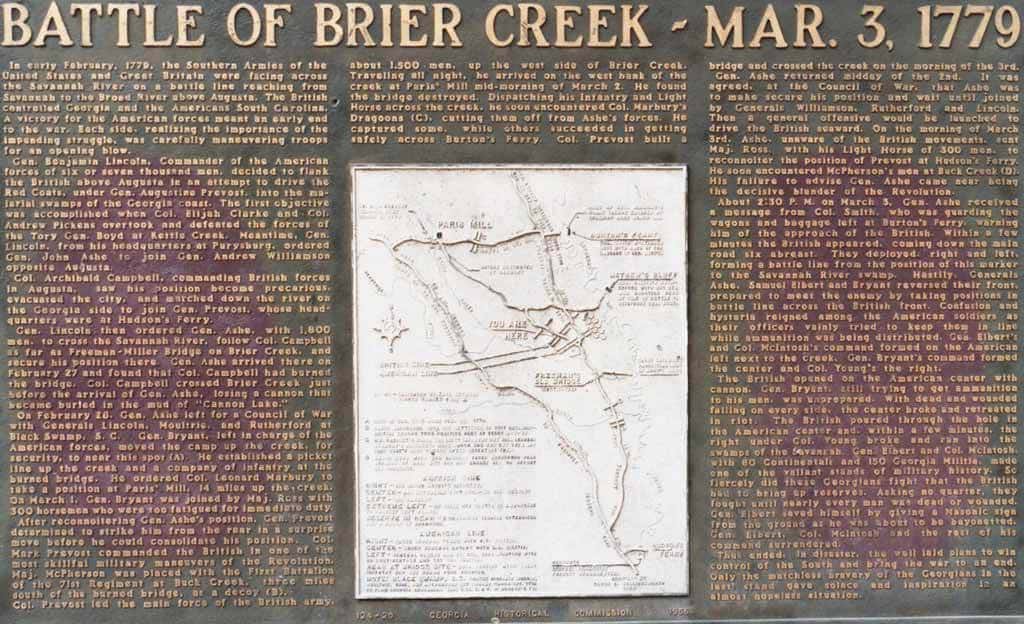
The Battle of Brier Creek was a battle fought near the confluence of Brier Creek with the Savannah River in eastern Georgia. A Patriot force consisting principally of militia from North Carolina and Georgia was surprised, suffering significant casualties.
The battle occurred only a few weeks after a resounding American Patriot victory over the British at Kettle Creek, north of Augusta, reversing its effect on morale.
Facts about the Battle of Briar Creek
- Armies - American Forces was commanded by Gen. John Ashe and consisted of about 1,700 Soldiers and militiamen. British Forces was commanded by Lt Col. Mark Prevost and consisted of about 900 Soldiers.
- Casualties - American casualties were estimated to be 150 killed, unknown wounded, and 227 captured. British casualties were estimated to be 5 killed and 11 wounded.
- Outcome - The result of the battle was a British victory. The battle was part of the Southern Theater 1775-82.
Prelude
On February 13, General John Ashe joined up with Williamson at his post during the evening. That same night, the British foces evacuated Augusta.
On February 14, Colonel Archibald Campbell withdrew his British forces from Augusta and stopped at Hudson's Ferry, located about 15 miles south of Briar Creek. Brigadier General Augustine Prevost sent some reinforcements to Hudson's Ferry with orders to stop Ashe's advance.
The British plan was for Major MacPherson to occupy the south bank of the creek as a diversion. Prevost's younger brother, Lieutenant Colonel Mark Prevost, would then take a 900-man force and make a 50 mile wide circle movement towards the west and attack the American rear.
On February 25, Ashe's force crossed into Georgia and made his way to Savannah.
On February 27, Ashe entered the Briar Creek area and found that the only bridgecrossing had been destroyed by the retreating British forces. The creek was too deep to wade across since it ran through a deep swamp almost 3 miles wide. He decided to rebuild the destroyed bridge and construct a road to Savannah so that Rutherford could reinforce his army from Matthew's Bluff, South Carolina. Matthew's Bluff was about 5 miles to the east of Briar Creek.
Prevost decided to execute an attack plan devised by Campbell before he left.This plan involved making a large loop, crossing over Brier Creek at a bridge further north and west, and then moving south and trapping Ashe's men on the triangle of land where the creek and the river met. A decoy force would demonstrate at the destroyed bridge site to distract Ashe's men.
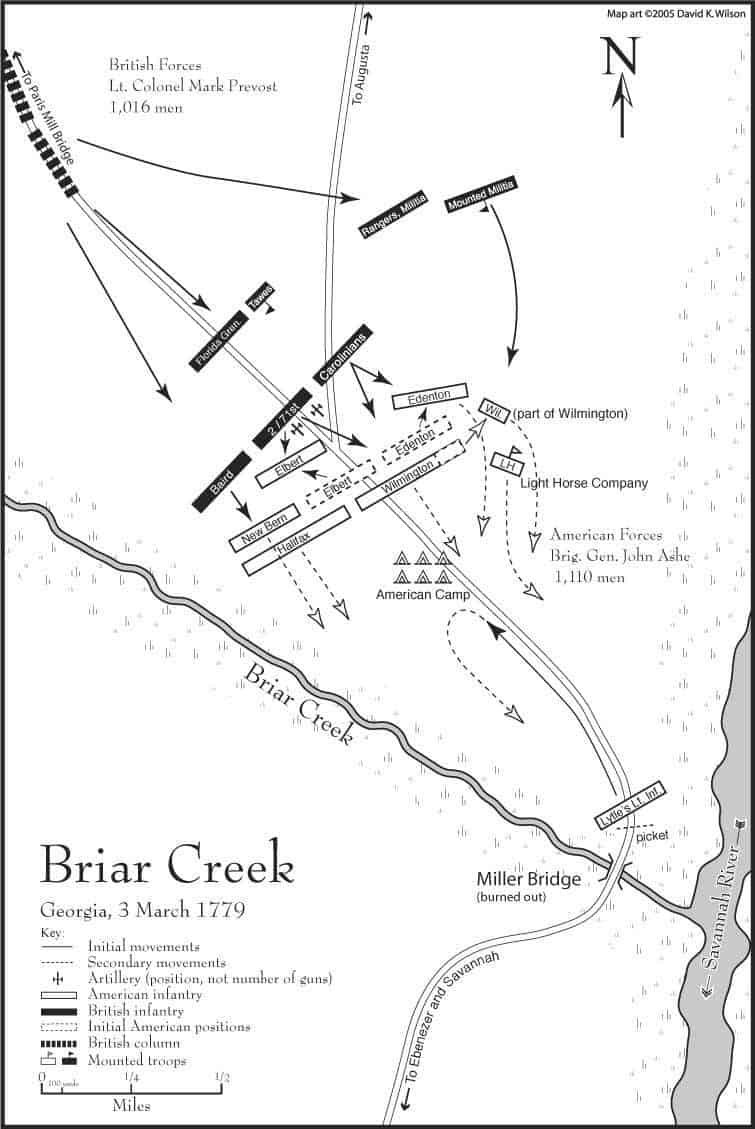
On March 1, the decoy force, about 500 men including regulars and militia, openly marched north until they were with three miles of the burned-out bridge, and made camp there. That night, about 900 experienced troops drawn primarily from the 71st Regiment and James Baird's light infantry companies and also including five field pieces and a number of experienced militia units, including members of the Florida Rangers. They made a rapid march north to the Paris Mill Bridge.
On March 2, arriving around 10:00 AM, they found the bridge destroyed, and set about building a temporary bridge to get their equipment across. Concerned that they might be discovered, Prevost sent Baird's light infantry and a company of light dragoons to ford the river that night. They acted as a screen against discovery of the ongoing work, and cut off Ashe's escape route.
On March 3, by dawn, Prevost's full party had crossed the river. While participants later disagreed on whether or not patrols from Ashe's camp were aware of the British movement, he took no particular action to guard against the possibility.
Battle Begins

On March 3, during the afternoon, a rider galloped into the American camp, warning of the British approach. While the exact amount of time they had to deploy is uncertain, the relatively hurried nature of their deployment was clear.
The number of troops that actually formed up was about 900, as a number of troops had been dispatched to the south for scouting, and others were on duty at the burned-out bridge. Distribution of ammunition to the men was complicated by the shortage of cartouche boxes and varying musket calibers.
When the American lines were finally formed, the left side was flanked by Brier Creek, but there was a large gap on the right side, between the end of the line and the river. The left was held by the North Carolina New Bern regiment, the center by a combination of Georgia militia and Continental Army units under Samuel Elbert, and the right was held primarily by the North Carolina Edenton regiment.
Prevost's troops approached in three columns. Baird's light infantry were on the left, the 1st Battalion of the 71st was in the center, and Carolina provincials and "rangers" formed the right. Prevost held in reserve the light dragoons and grenadiers.
Both sides opened fire at long range, and then Elbert's men moved forward to close the range. Two things then occurred to create a gap in the American line. Elbert's men drifted left as they advanced, partially screening the fire from the New Bern men, and British cavalry threatened the right, drawing the Edenton men away from the center.

Seeing this opening, Prevost ordered his men to fix bayonets and charge. Most of the Patriot militia did not have bayonets. Seeing the British charging at them, many broke and ran without even firing a shot. The Edenton men fired a few rounds, and then abandoned the fight. Elbert's Continentals held formation in the center while the militia around them fled for the swamps, and were eventually surrounded, forcing Elbert to surrender. The 200 men at the bridge came up to the battlefield late in the fighting, but quickly withdrew before getting drawn into the rout.
Late that afternoon, the battle had finally ended with the American forces suffering a humiliating defeat. With their victory, the British restored their hold on Georgia. Many of the Patriots demanded that Ashe be brought up on charges for this embarrassing defeat.
Aftermath
The carnage on the American side was never fully tallied, as many militiamen retreated all the way back to North Carolina, and an unknown number drowned in the swamps.
Anthony Lytle, the commander of the American light infantry, dispersed his men to avoid capture. Ashe was seen riding after the militia companies, and was widely blamed for the disaster, often amid claims that he led the retreat. A court martial acquitted him of charges of cowardice, but did convict him of failure to secure his camp.
Brier Creek stalemated American attempts to force the enemy out of the new state and guaranteed British domination of the region. Brigadier General William Moultrie, in his memoirs of the war, wrote that the loss at Brier Creek extended the war by a year and made possible the British invasion of South Carolina in 1780.