The Battle of Saratoga (First)/ Freeman’s Farm
September 19, 1777 at Stillwater, New York

Battle Summary
The two battles of Saratoga (Freeman’s Farm and Bemis Heights) marked the climax of the Saratoga Campaign 1777. They gave a decisive victory to the Americans over the British. Lieutenant General John Burgoyne led an invasion army southward from Canada in the Champlain Valley, hoping to meet a similar British force marching northward from New York City, and another British force marching eastward from Lake Ontario.
Unfortunately for the British, the southern and western forces never arrived and Burgoyne was surrounded by American forces in upstate New York. He fought two small battles to break out which took place 18 days apart on the same ground. They both failed.
Burgoyne found himself trapped by superior American forces with no relief in sight, so he retreated to Saratoga (now Schuylerville) and surrendered his entire army there on October 17. His surrender, says historian Edmund Morgan, “was a great turning point of the war because it won for Americans the foreign assistance which was the last element needed for victory.”
Burgoyne’s strategy to divide New England from the Southern Colonies had started well but slowed due to logistical problems. He won a small tactical victory over Major General Horatio Gates in the Battle of Freeman’s Farm. The battle began when Burgoyne moved some of his troops in an attempt to flank the entrenched American position on Bemis Heights.
Major General Benedict Arnold anticipated the British maneuver and placed significant forces in his way. Burgoyne did gain control of Freeman’s Farm, but it came at the cost of significant casualties. Skirmishing continued in the days following the battle, while Burgoyne waited in the hope that reinforcements would arrive from New York City. Patriot militia forces continued to arrive, meanwhile, swelling the size of the American army. Disputes within the American camp led Gates to strip Arnold of his command.
Facts about the Battle of Saratoga (First)/ Freeman’s Farm
- Armies – American Forces was commanded by Gen. Horatio Gates and consisted of about 10,000 Soldiers. British Forces was commanded by Gen. John Burgoyne and consisted of about 7,200 Soldiers.
- Casualties – American casualties were estimated to be 90 killed and 240 wounded. British casualties was approximately 600 killed or wounded.
- Outcome – The result of the battle was a pyrrhic British victory. The battle was part of the Saratoga Campaign 1777.
Prelude
Burgoyne led the main expedition of the Saratoga Campaign south from Canada towards Albany, New York. They had taken all the positions and forces in their path.
American resistance got firmer as the British crossed to the west bank of the Hudson River at Saratoga, New York and marched about nine miles farther south.
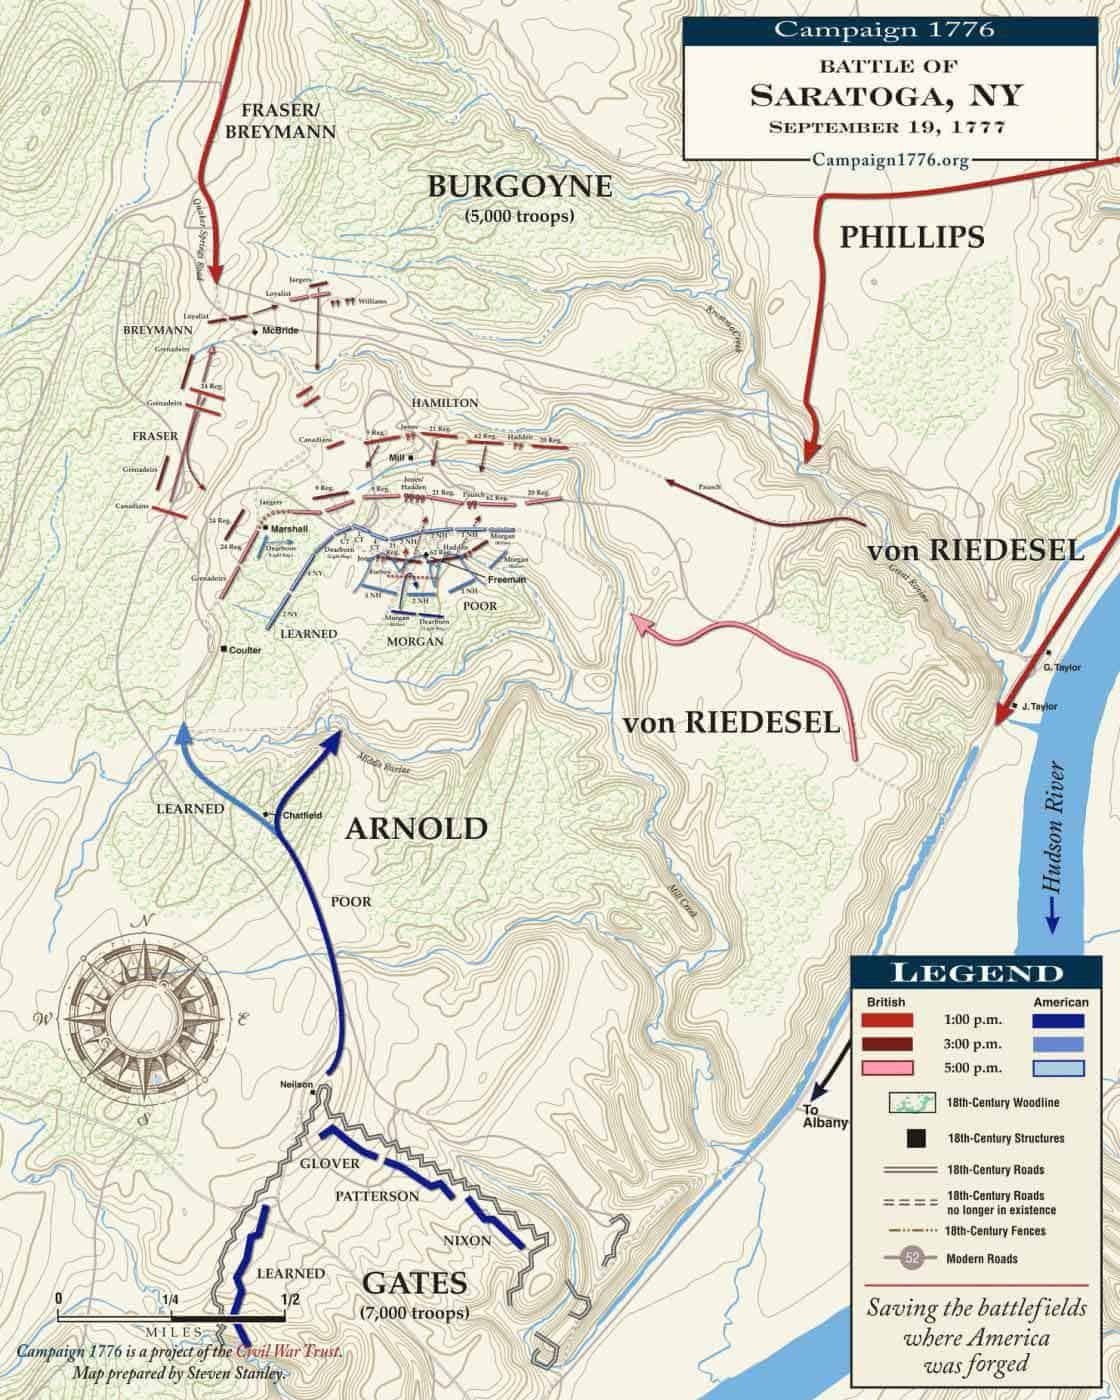
The Americans had fortified the elevation known as Bemis Heights, 10 miles south of Saratoga. The British advanced in three columns toward the heights, which were two miles to their south.
Major General Friedrich Riedesel led the left column of Brunswickers on the river road, bringing the main artillery and guarding supplies and the boats on the river.
Brigadier General James Inglis Hamilton commanded the center which would attack the heights.
Brigadier General Simon Fraser led the right wing with his 24th Regiment of Foot and both the light infantry and grenadier battalions, to turn the American left flank. The American right was anchored by the Hudson River.
The American forces were not particularly well organized or prepared for this engagement. Gates had just taken command of the Northern Department, after Burgoyne captured Fort Ticonderoga. General George Washington had sent a number of experienced units north so that Saratoga’s battles had regulars on both sides.
Before this Burgoyne had mostly faced militia. But the American command structure was troubled. Arnold nominally had command of the left wing. However, he had no orders for battle and Gates would only authorize a reconnaissance.
On September 13-14, Burgoyne’s force crossed over to the west bank of the Hudson River. After they finished crossing, they moved southward.
On September 17, the British made camp near Sword’s Ford, only four miles north of the American position on Bemis Heights. The Americans occupied a high bluff overlooking the Hudson River, near Bemis’s Tavern.
On the right flank, Gates had 3,000 troops and the bulk of his artillery. A little to the west, near a farmhouse, Gates had placed his center, commanded by Brig. Gen. Ebenezer Learned. On the left flank, he placed several regiments, commanded by Arnold, and Col. Daniel Morgan’s men.

On September 18, the vanguard of Burgoyne’s army had reached a position just north of Saratoga, about four miles from the American defensive line, and skirmishes occurred between American scouting parties and the leading elements of his army.
The American camp had become a bed of festering intrigue ever since Arnold’s return from Fort Stanwix. While he and Gates had previously been on reasonably good terms, Arnold managed to turn Gates against him by taking on officers friendly to Schuyler as staff, dragging him into the ongoing feud between the two.
These conditions had not yet reached a boil on September 19, but the day’s events contributed to the situation. Gates had assigned the left wing of the defenses to Arnold, and assumed command himself of the right, which was nominally assigned to Gen. Lincoln, whom Gates had detached in August with some troops to harass the British positions behind Burgoyne’s army.
Both Burgoyne and Arnold understood the importance of the American left, and the need to control the heights there.
At 10:00 AM, after the morning fog lifted, Burgoyne ordered the British army to advance in three columns. Gen. Baron Riedesel led the left column on the river road, bringing the main artillery and guarding supplies and the boats on the river; Gen. James Inglis Hamilton commanded the center column, which would attack the heights; and Gen. Simon Fraser led the right wing, to turn the American left flank by negotiating the heavily wooded high ground north and west of Bemis Heights.
Arnold had realized that such a flanking maneuver was likely, and petitioned Gates for permission to move his forces from the heights to meet potential movements, where the American skill at woodlands combat would be at an advantage. Gates, whose preferred strategy was to sit and wait for the expected frontal assault, grudgingly permitted a reconnaissance in force consisting of Daniel Morgan’s men and Henry Dearborn’s light infantry.
When Morgan’s men reached an open field northwest of Bemis Heights belonging to Loyalist John Freeman, they spotted British advance troops in the field. Fraser’s column was slightly delayed and had not yet reached the field, while Hamilton’s column had also made its way across a ravine and was approaching the field from the east through dense forest and difficult terrain. Riedesel’s force, while it was on the road, was delayed by obstacles thrown down by the Americans. The sound of gunfire to the west prompted Riedesel to send some of his artillery down a track in that direction. The troops Morgan’s men saw were an advance company from Hamilton’s column.
Battle Begins

Colonel Daniel Morgan placed marksmen at strategic positions, who then picked off virtually every officer in the advance company. Morgan and his men then charged, unaware that they were headed directly for Burgoyne’s main army. While they succeeded in driving back the advance company, Fraser’s leading edge arrived just in time to attack Morgan’s left, scattering his men back into the woods.
James Wilkinson, who had ridden forward to observe the fire, returned to the American camp for reinforcements. As the British company fell back toward the main column, the leading edge of that column opened fire, killing a number of their own men.
There was then a lull in the fighting around 1:00 PM as Hamilton’s men began to form up on the north side of the field, and American reinforcements began to arrive from the south. Learning that Morgan was in trouble, Gates ordered out two more regiments to support him, with additional regiments from the brigade of Brigadier General Enoch Poor to follow. Burgoyne arrayed Hamilton’s men with the 21st Regiment on the right, the 20th Regiment on the left, and the 62nd Regiment in the center, with the 9th Regiment held in reserve.
The battle then went through phases alternating between intense fighting and breaks in the action. Morgan’s men had regrouped in the woods, and picked off officers and artillerymen. They were so effective at reducing the latter that the Americans several times gained brief control of British field pieces, only to lose them in the next British charge. At one point, it was believed that Burgoyne himself had been taken down by a sharpshooter; it was instead one of Burgoyne’s aides who was the victim. The center of the British line was nearly broken at one point, and only the intervention of General Phillips made it possible for the 62nd Regiment to reform.

The final stroke of the battle belonged to the British. Around 3:00 PM, Riedesel sent a messenger to Burgoyne for instructions. He returned two hours later with orders to guard the baggage train, but also to send as many men as he could spare toward the American right flank. In a calculated risk, Riedesel left 500 men to guard the vital supply train and marched off toward the action with the rest of his column. Two of his companies advanced on the double and opened vicious fire on the American right, and Fraser’s force threatened to turn the American left flank.
In response to the latter threat, Arnold requested more forces, and Gates allowed him to dispatch Ebenezer Learned’s brigade. If Arnold had been on the field, these forces might have instead faced the larger danger posed by Riedesel’s force. Fortunately for the American right, darkness set in, bringing an end to the battle. The Americans retreated back to their defenses, leaving the British on the field. Burgoyne had gained the field of battle, but at a heavy cost.
Aftermath
Burgoyne had taken the Freeman’s Farm but suffered nearly 600 casualties, most of them to Hamilton’s center column. Not only could he ill afford the men and equipment lost, he had lost the initiative. The British and Brunswick forces constructed redoubts on the farm and fortified their original crossing point of the Hudson.
At the end of the battle, both sides were dug in about two miles apart. Burgoyne’s force was down to about 6,000 effective fighters and was short on supplies and rations. Gates still had about 7,000, with more militia arriving daily.
Gates quickly reported the action to the Congress and New York’s governor. While the field commanders and men universally credited Arnold for their success, Gates’ best efforts were to ensure that no one other than himself received credit. Arnold’s protests were loudest in what he viewed as a slight to Learned, Poor, and Morgan and their men. The rift separating Arnold and Gates grew deeper, and Gates ensured that Arnold had no command going in the Battle of Bemis Heights.
